Nail Tutorial: Dots of Colors
Finally managed to squeeze in some weekend medi and pedi. =) Fiance did not allow me to follow for a Harley ride. So decided to just get my nails done instead..
So as many of you know.. I LOVE COLORS! I just adore colors. They either make my day or just make me feel special. So I decided on colorful polka dots (again) and here is how to get it done.
1. Base Coat
- I need to stress that base coat is very important! Please use really good base coat so that your nail color won't turn yellow - ish.
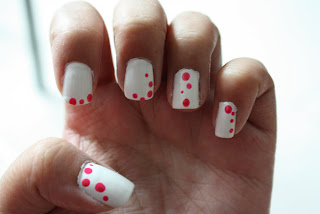
2. White Base Color
- Apply white color as your base nail color. I chose white so that the colors can stand out brighter.
3. Shocking Pink
- Using your dotting tool or a toothpick. You want to dot on some pink dots all over your nails.
 4. Blue Dots
- Using the dotting tool and the toothpick you want to dot on some blue dots, it is ok if your dots overlay above the pink dots. Makes an extra pop.
 5. Coral Orange
- Now using a slighter orange coral color add more dots around your nails.
 6. Light Turqoise
- Dot it on. Now just dot on don't worry about overlaying it.
 7. Lavender Dots
- Then you want to dot on a lighter lavender color. If the color is to light you can dot it more than once.
 8. Yellow Dots
- Your almost done now. Just dot on the yellow dot to add that extra attention to your nails. And walah! Your nail art is done.
 9. Top Coat
- Apply the top coat to protect your nail art. And let it dry! And your done!!

Ain't it simple to get this nail art done? Have fun with it and have a colorful polka dot weekend!!

So as many of you know.. I LOVE COLORS! I just adore colors. They either make my day or just make me feel special. So I decided on colorful polka dots (again) and here is how to get it done.
1. Base Coat
- I need to stress that base coat is very important! Please use really good base coat so that your nail color won't turn yellow - ish.
2. White Base Color
- Apply white color as your base nail color. I chose white so that the colors can stand out brighter.
3. Shocking Pink
- Using your dotting tool or a toothpick. You want to dot on some pink dots all over your nails.

- Using the dotting tool and the toothpick you want to dot on some blue dots, it is ok if your dots overlay above the pink dots. Makes an extra pop.

- Now using a slighter orange coral color add more dots around your nails.

- Dot it on. Now just dot on don't worry about overlaying it.

- Then you want to dot on a lighter lavender color. If the color is to light you can dot it more than once.

- Your almost done now. Just dot on the yellow dot to add that extra attention to your nails. And walah! Your nail art is done.

- Apply the top coat to protect your nail art. And let it dry! And your done!!

Ain't it simple to get this nail art done? Have fun with it and have a colorful polka dot weekend!!


Comments