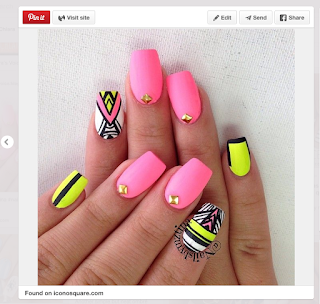
Nail Tutorial: Neon Tribal.
I finally managed to have time to DIY my own nails. After all the busy days at the restaurant, bloody hell, my nails needed extra love and attention alright. I went on Pinterest and started searching for what I wanted.. And I found this.
I am NOT professional manicurist. I thought this was a easy task, boy was I wrong! I ended up doing my nails for more than 4 hours! 4 HOURS!!
Colours I used for this nail art.
1. Base Coat
- I don't know how to stress the importance of Base Coat, if you don't want your nails to be yellow.. PLEASE apply base coat.
2. Base Color
- Following the picture, Neon Pink and Yellow and of course on the pointer white. That's where the nailart is going to be at.
3. Triangles?!
- I did not have proper brush tools, wait then again I did.. BUT I had no idea how to get my triangle shape right. Also, I had short nails.. I do miss my long nails.
4. Drawing the 'artwork'
- So tada, after attempting to draw the artwork. How's this?? OK BAH! My right hand only I took extra 2 hours to get the artwork right.
5. Lining out.
- Using the black acrylic paint you want to draw out the lines on the neon painted nails.
6. Top Coat
- So instead of using the top coat that is glossy. Following the picture on Pinterest, we applied on Matte top coat.
I'm actually pretty happy with the outcome. Thou it took me bloody 4 hours to do it!! Give it a try. You never know you are able to make a sophisticated nail art on your own!!


Comments